Showing posts with label some of my how to dos. Show all posts

Wednesday, February 11, 2015

May Arts Ribbon and Faber-Castell week

 Sometimes you just want to add a little sass to some sweet lace.
 Awesome May Arts Ribbon and super fun Faber Castell make such a fun pair.  The two are getting together for a full week of inspiration and prizes.  Hop along with us and you could win a $50 prize pack of FC goodies and 3 rolls of ribbon.  Read all about it on the May Arts Ribbon blog HERE.

 My little girl is no girly girl so white lace really ain't her style.  So to add a little spice to a bow I was making for her hair, I brought out the gelatos.  You can easily customize any ribbon with all the cool colors of gelatos out there.
 Today I'm using May Arts 2 Inch Elastic Lace in white and Faber Castells Designer Colors pack in Tropical.

 To get the look just rub the gelato stick right onto the lace.  Then blend using the brush that comes in the pack and a little bit of water.
 That's it!

 Here's how the bow turned out for her.  Perfectly fitting her personality.
Alright now on to Mallika's blog HERE and if you want to see more inspiration from the hop, head to the May Arts Ribbon blog HERE.

post signature

Thursday, January 29, 2015

Ribbon hearts: May Arts Valentine's Hop

 Get ready to feel the love.
 The May Arts Ribbon DT are bringing you a hop full of all things Valentines Day.  SO get ready to be inspired and win some ribbon too.  Head on over to the May Arts Ribbon blog to see all the ribbonistas and enter to win.

Today I bring you something fun that you could add to any project big and small.
A mini ribbon heart
 You could use any type of ribbon to make these cute heart.  I used 3/8 velvet gold dots, 1/2 woven burlap and 5/8 Woven chevron stripes.  I adore how these came out and they are super easy.

 Next up on the hop is Karen Hanson and if you need to start at the beginning then you can head to the May Arts Ribbon Blog HERE.
XOXO
post signature

Monday, November 10, 2014

May Arts Ribbon and Coredination hop

It's time for another awesome team up hop with May Arts Ribbon and Core'dinations.
The May Arts design team are sharing inspiration all week long and you have a chance to win some goodies too.  If you haven't yet, spot by the May Arts Ribbon blog HERE for all the details.

For my post I went all festive with the holidays sneaking up on us.
A little holiday house gift box.
This box was easy to make and once assembled, easy to decorate with wonderful May Arts Ribbon.
First to start cut a piece of core'dination cardstock to 9" x 11"
Score the piece at 3" and 6" on the short side and 4" and 7" on the long side.
crease the score lines really good and then fold the box to form a "house" like so below.
Use double sided tape to adhere the folded creased pieces inside of the box to the two longer sides.  You can see this in the picture below.  Then cut the triangular top on the two long sides.  Start at the corner where the two sides meet and end in a point in the top middle.
The last step in to add a top for your house box by cutting a strip of paper to be 4" x 3 1/4" and creased down the middle.
I decorated m house with May Arts Adhesive Scallop Boarder around the top.  Added a cute little puffy heart from the Satin Cut Outs collection and ten tied it up all pretty with some Bakers Twine.

This would be cute to put little toys in or a gift card to give as a gift or to even place them on a table for a holiday party.  Simple to make, with not a lot of supplies and super adorable.
I hope you enjoyed what I created with awesome May Arts Ribbon and cool Core'dinations paper.
Don't forget to stop by the May Arts Ribbon blog to check out all the great inspiration all week and for a chance to win a nice price.

post signature

Thursday, February 6, 2014

May Arts Ribbon release week with PRIZES!

 Hello Hello!
Wanted to shout it out to all of you who don't know it yet.
IT'S MAY ARTS RIBBON RELEASE WEEK!
I'm so in love with every single roll of awesomeness.  There really is something for everyone.
In celebration, the May Arts Ribbonistas are getting together for a week of lovely inspiration using the new stash.  AND the awesome ribbon lady is giving away the winners choice of 2 spools from the new release.  Read all about it HERE.
 Don't forget to stop by the May Arts ribbon blog HERE to check out my project.
I would so totally adore it if you did.
Plus I have a tutorial on that little hanging hearts mobile.
post signature

Saturday, December 7, 2013

Two jazzy branches for the holiday Day 7 of 12 Days of Holiday Inspiration

 Hello hello!
I don't know about you, but I'm all about being cheap and fabulous.  I know I sound crazy but I got two ideas that explain this perfectly.
  In a nutshell I'm just talking about gathering old dried up branches and spray painting them.  Easy, cheap and they look so cool.  This one was sprayed with Rust-oleum "Gold Metallic" and then topped with a coat of their "Gold Glitter" spray.

 This one branch takes a little bit more work but just look how it shines.
 This branch was sprayed with white paint and then wrapped with lights.
Tip:  The lights stick out from the wire so to get a more "branchy" look I wrapped the cord around the lights so they lye flat on the branch (see the picture below).

 I love dead branches and I hope you do too now.
Now to see what amazing crafts the other "Inspiration Crew" gals have.

 I think you know by now but don't forget about the GIVEAWAY!
 You get one entree by doing each of the following
Follow my blog HERE (email or blog lovin' or whatever)
Like my Facebook page HERE and leave me a comment there.
Follow me on Instagram HERE and leave me a comment here.
Follow me on Twitter HERE and tweet the hop and link me.
and a BONUS 10 extra points each for sharing the giveaway picture on your blog, Facebook, Instagram, or twitter.  Leave a comment after each.
That's a total of 34 possible chance EACH DAY to win all this holiday goodness.
(Contest ends on December 13, winner will be randomly chosen from all qualified entrees

Happy Hopping!
post signature

Friday, December 6, 2013

Easy Mini Tree #1 Day 6 of 12 Days of Holiday Inspiration

 So this post is coming at you a little late but it's still the 6 of December in Hawaii so I'm going with it!
I'm a Christmas Mini Tree maker fanatic.  I already made four this year (the first one being the Lawn Fawn star tree HERE and two more coming to the May Arts Ribbon blog soon).  Today I bring you a super simple and awesome burlap and glitter tree.
 If you haven't notice yet, it's all about burlap for me this holiday.
 Here I used May Arts 1.5inch faux Burlap in white and made it gather one side.  Gathering is easy to do because it's wired.  Then just glue the gathered side down to a cone and you have a cool flared burlap tree.  To give it that extra little somein' I lined the edges with glitter and topped it with a bow.
Go ahead and make yourself a mini tree.  These are super easy and adds a great addition to your holiday decorations.  Now to check out all the goodies the other ladies have.

Before you leave don't forget to enter!
You get one entree by doing each of the following
Follow my blog HERE (email or blog lovin' or whatever)
Like my Facebook page HERE and leave me a comment there.
Follow me on Instagram HERE and leave me a comment here.
Follow me on Twitter HERE and tweet the hop and link me.
and a BONUS 10 extra points each for sharing the giveaway picture on your blog, Facebook, Instagram, or twitter.  Leave a comment after each.
That's a total of 34 possible chance EACH DAY to win all this holiday goodness.
(Contest ends on December 13, winner will be randomly chosen from all qualified entrees)
 
Happy hopping!
post signature

Monday, December 2, 2013

Make a mailable card display tutorial

 Hello and welcome to day two of the inspiration crews 12 days of  holiday projects blog hop.
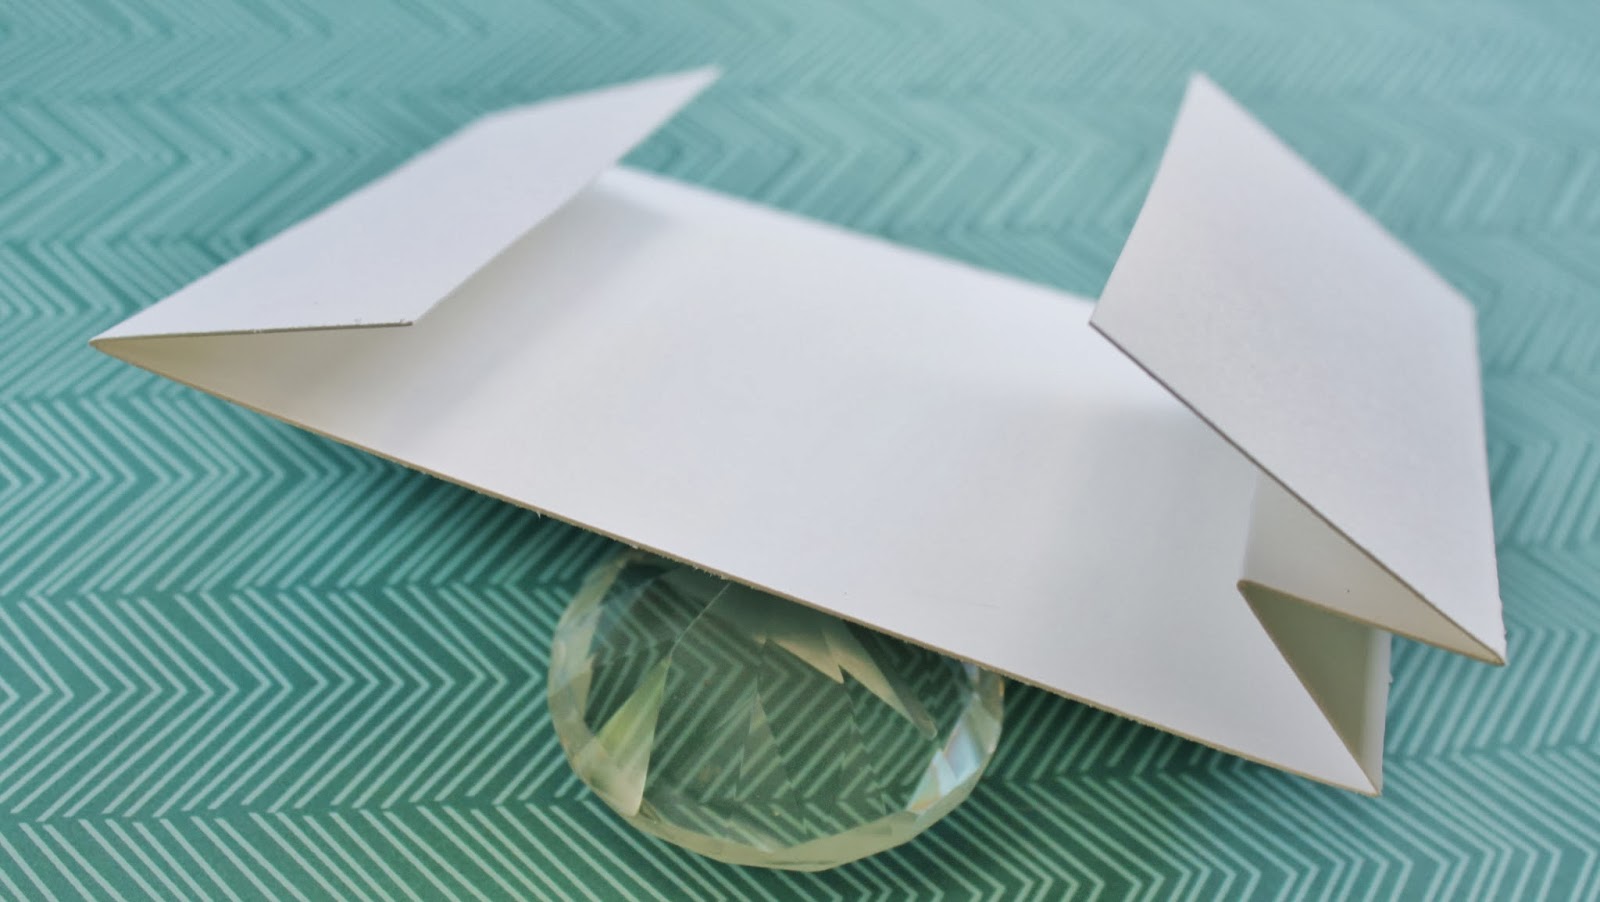
Today I'm sharing a DIY card self standing display that's totally mailable.
 I enjoy making our family's holiday cards every year.  A lot of thought, product and time goes into each card I make for our family and friends so I thought of away to make these cards displayable.

 For the base of this card you'll need just one really sturdy 11 x 8 1/2 piece of paper.
Cut it so you have one strip of 11 x 4 1/4 and two peices of 5 1/2 x 4 1/4 (you'll only be using one of these)

 Next take the longer piece and score it at 1 1/2, 7, 8 and 9

 Fold creases like so

 The next step is to adhere the front 5 1/2 x 4 1/4 piece to the end tabs.
In the picture below you can see inside the display where the ends or adhered to the front piece.

That is basically it.
Now you just have to add your picture and make it pretty.

Since we have family all over it was important that this card, although a display, was mailable.
The design of it makes it easy to flatten and fits into a regular size card envelope.
Note: You may have to pay more for shipping depending on the products you use.

Thanks so much for stopping by.  And if you ever make a "mailable card display" please let me know.  I would love to see it!
Now go check out all the holiday awesomeness the rest of the ladies have for you.

 Also be sure to enter my holiday giveaway!
You get one entree by doing each of the following
Follow my blog HERE (email or blog lovin' or whatever)
Like my Facebook page HERE and leave me a comment there.
Follow me on Instagram HERE and leave me a comment here.
Follow me on Twitter HERE and tweet the hop and link me.
and a BONUS 10 extra points each for sharing the giveaway picture on your blog, Facebook, Instagram, or twitter.  Leave a comment after each.
That's a total of 34 possible chance EACH DAY to win all this holiday goodness.
(Contest ends on December 13, winner will be randomly chosen from all qualified entrees)

Have fun hopping!
post signature

Tuesday, November 19, 2013

Upcycled Wall Decor

Today I'm over on the May Arts Ribbon blog with a Shabby Chic, Cheap and Quick DIY upcycle tutorial.  Stop on over to make one for your house.
Upcycled Wall Decor on the May Arts Ribbon Blog
post signature

Wednesday, October 16, 2013

7 Days of Halloween: Day 7

 Hello again to another Halloween DIY day.
Today I'm bringing back and oldy but goody up-cycled Halloween project.
Making your own tombstone
I actually made these a couple years ago after seeing them somewhere online (pretty sure it was Martha but can't find it now).   I loved the ones we made before but never did a DIY on them so thought it was about time.

You need to first start off with a foam cooler.  I up-cycled one that was used.  Just make sure you clean it out really good.

Cut it up
 Next you want to take off the top and cut the box on all the seams with a sharp knife.  You should end up with 6 pieces.

 Give it some charm
Use a pen and lightly draw out a design then carve out the design with a sharp tool.  I used a small pick but you could use anything even a pencil.  I like to give my panels a distress look so I chipped away at the sides and top of it.  You could also glue items onto the panel like I did with the bat.  Just make sure that you use an adhesive that is safe for foam.

 Time for color
For this step I used a gentle spray paint, one that is made for floral use.  Now spray the whole thing black.  Make sure to get the sides and especially into all the cracks you carved out.
 For a little more definition you can lightly spray over parts of the panel with a white spray paint.  Don't go crazy with the white and I would hold the can farther away then usual.

All that is left is to display it.  I put mines outside and it works fine...rain and all.

Okay Halloween hop is totally over for the awesome ladies that made amazing project with season.  BUT you can still be inspired and find all our projects on pinterest HERE don't forget to follow our board.  All so look for us on instagram with the hashtag #theinspirationcrew
post signature