(This tutorial is associated with the May Arts and Scor-Pal inspiration hop. Scroll up to check out all the great inspiration from both DTs and a chance to win a lot of awesomeness.)
The school year will be coming to an end soon and now is the time to show those teachers how much we appreciate them putting up with our kids. Joking but I really do adore my children's teachers this year and wanted to get them something they wanted. After seeing many FB post from actual teachers it seams like they really want gift cards. That I can totally do! But the crafter inside me had to make it pretty! So here is what I came up with.
A mini paper Backpack and Gift Card holder
This is a super cute way to give a gift card. It's personal and easy to make.
So you know what time it is...
Let's start with the Backpack.
So you know what time it is...
Let's start with the Backpack.
The dimensions of a finished bag will be: 2 1/2 x 3 1/2 x 1/2
This will be just big enough to hold the card.
1. Supplies
Large paper rectangle in 6 1/2 x 4
Small paper rectangle in 2 1/2 x 1 1/2
Yummy May Arts ribbon
Scor-Pal and Scor-Tape
Hole punch and scissors
2. Score it
On your big rectangle you will score it long ways at 2 1/2", 2 3/4", 3", 5 1/2", 5 1/4", and 6". These will be referred to as vertical lines.
Then score at 1/2" on the other side. This will be your horizontal line.
For the small rectangle, score 1/2" on the short side.
2. Cut it
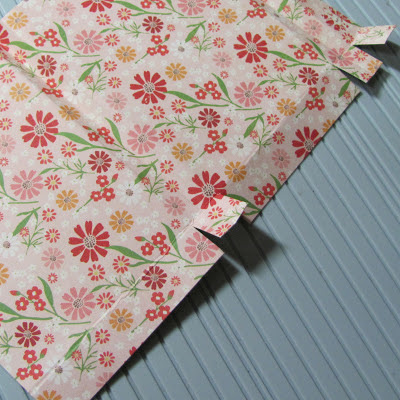
Working on the side with the 1/2" score line, cut on vertical score lines up to horizantal score line.
(See below picture)
3. Tape it
Using the bottom picture as a guide, apply scro-tape to flaps.
4. Punch it and weave it
Before you assemble your bag you want to punch holes in the back panels where the ribbon will be weaved through.
Two holes (not too close together) at the top and one on each bottom corner.
There's no need to measure just as long as you stay in the general area.
I also added a tab punch to the front panel (not shown).
Weave ribbon through holes as shown. Knot the ends on the inside of the bag.
5. Finish it up
Now go ahead and assemble your bag. The last step will be adding the top flap.
That's it!
Now you have a cute little paper backpack.
I added a little tag but that's about is. These things are just adorable all on their own.
Front
Back
Now time for the gift card holder.
This one is super fast.
This one is super fast.
1. Supplies
Rectangle paper 6" x 3 1/2"
Scor-Pal
Staple
2. Score it
Score the rectangle on the long side at 2 1/4" and 4 1/2'
3. Make a sleeve
Crease your edges and flip over the short end. Add a staple to the bottom in the middle on the short piece. See the photo bellow. This is the sleeve to hold your gift card.
4. Accent it
Your holder was done at step three but I think it needs a little jazz so here you go.
Round all corners.
Add a piece of white cardstock to the inside so you can write a personal message.
Add a picture to the outside aka cover.
Slip the gift card into the sleeve and stick the card in the backpack.
This project really didn't take long to make and I hope the teachers like the presentations. My babies wrote some sweet things in the inside of their cards.
Here are the awesome goods I used for this project.
May Arts Ribbon
also
Echo Park "For the Record 2 Tailored" Collection
Don't forget to scroll up and hop with May Arts and Scor-Pal today and tomorrow.
Also linking this up to the
Gift Card Holder Challenge in the Moxie Fab World
You know I would love to see if you make these so please be sure to link in the comments if you do.
Don't forget to scroll up and hop with May Arts and Scor-Pal today and tomorrow.
Also linking this up to the
Gift Card Holder Challenge in the Moxie Fab World
You know I would love to see if you make these so please be sure to link in the comments if you do.


5 comments:
You rock Miss Thing! That little backpack is uber cute!!!! What a great idea!
Wow! What a clever creation! I've been missing out lately, but glad to be back and checking out your projects.
Wow Clever idea for gift to teachers !Lovely backpack .Thanks for the tut !
that is so cute, thanks for shraing
Hey Lalo! Thanks for linking this up to the Gift Card Holder Challenge in the Moxie Fab World! I'm so glad you joined in on all the fun! :)
Post a Comment